JavaScript - Magic Mirror
This web application extends the Hello World Tutorial, adding media processing to the basic WebRTC loopback.
注解
This tutorial has been configurated for using https. Follow these instructions for securing your application.
For the impatient: running this example
You’ll need to install Kurento Media Server before running this example. Read installation guide for further information.
Be sure to have installed Node.js and Bower in your system. In an Ubuntu machine, you can install both as follows:
curl -sL https://deb.nodesource.com/setup_4.x | sudo bash -
sudo apt-get install -y nodejs
sudo npm install -g bower
Due to Same-origin policy, this demo has to be served by an HTTP server. A very simple way of doing this is by means of an HTTP Node.js server which can be installed using npm :
sudo npm install http-server -g
You also need the source code of this demo. You can clone it from GitHub. Then start the HTTP server:
git clone https://github.com/Kurento/kurento-tutorial-js.git
cd kurento-tutorial-js/kurento-magic-mirror
git checkout 6.6.1
bower install
http-server -p 8443 -S -C keys/server.crt -K keys/server.key
Finally, access the application connecting to the URL https://localhost:8443/ through a WebRTC capable browser (Chrome, Firefox).
注解
These instructions work only if Kurento Media Server is up and running in the same machine
as the tutorial. Kurento Media Server must use WebSockets over SSL/TLS (WSS), so make sure
you check this too.
It is possible to locate the KMS in other machine simple adding the parameter ws_uri to the URL:
https://localhost:8443/index.html?ws_uri=wss://kms_host:kms_port/kurento
Notice that the Kurento Media Server must connected using a Secure WebSocket (i.e., the KMS URI starts with wss://). For this reason, the support for secure WebSocket must be enabled in the Kurento Media Server you are using to run this tutorial. For further information about securing applications, please visit the following page.
Understanding this example
This application uses computer vision and augmented reality techniques to add a funny hat on top of detected faces. The following picture shows a screenshot of the demo running in a web browser:
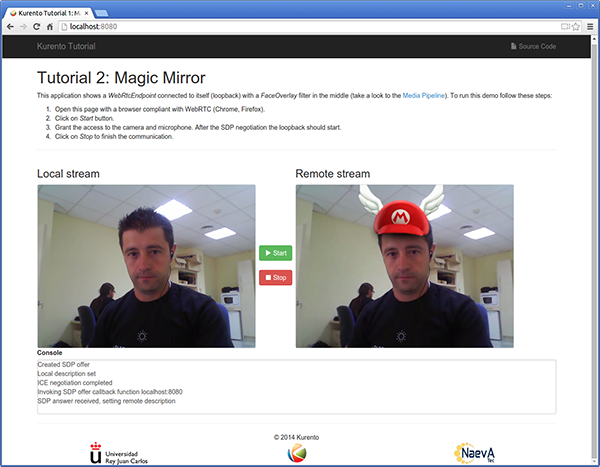
Kurento Magic Mirror Screenshot: WebRTC with filter in loopback
The interface of the application (an HTML web page) is composed by two HTML5 video tags: one for the video camera stream (the local client-side stream) and other for the mirror (the remote stream). The video camera stream is sent to the Kurento Media Server, processed and then is returned to the client as a remote stream.
To implement this, we need to create a Media Pipeline composed by the following Media Element s:
- WebRtcEndpoint: Provides full-duplex (bidirectional) WebRTC capabilities.
- FaceOverlay filter: Computer vision filter that detects faces in the video stream and puts an image on top of them. In this demo the filter is configured to put a Super Mario hat).
The media pipeline implemented is illustrated in the following picture:
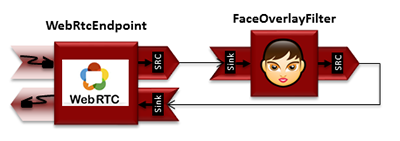
WebRTC with filter in loopback Media Pipeline
The complete source code of this demo can be found in GitHub.
JavaScript Logic
This demo follows a Single Page Application architecture (SPA). The interface is the following HTML page: index.html. This web page links two Kurento JavaScript libraries:
- kurento-client.js : Implementation of the Kurento JavaScript Client.
- kurento-utils.js : Kurento utility library aimed to simplify the WebRTC management in the browser.
In addition, these two JavaScript libraries are also required:
- Bootstrap : Web framework for developing responsive web sites.
- jquery.js : Cross-platform JavaScript library designed to simplify the client-side scripting of HTML.
- adapter.js : WebRTC JavaScript utility library maintained by Google that abstracts away browser differences.
- ekko-lightbox : Module for Bootstrap to open modal images, videos, and galleries.
- demo-console : Custom JavaScript console.
The specific logic of this demo is coded in the following JavaScript page: index.js. In this file, there is a function which is called when the green button labeled as Start in the GUI is clicked.
var startButton = document.getElementById("start");

startButton.addEventListener("click", function() {
   var options = {
     localVideo: videoInput,
     remoteVideo: videoOutput
   };

   webRtcPeer = kurentoUtils.WebRtcPeer.WebRtcPeerSendrecv(options, function(error) {
      if(error) return onError(error)
      this.generateOffer(onOffer)
   });

   [...]
}
The function WebRtcPeer.WebRtcPeerSendrecv abstracts the WebRTC internal details (i.e. PeerConnection and getUserStream) and makes possible to start a full-duplex WebRTC communication, using the HTML video tag with id videoInput to show the video camera (local stream) and the video tag videoOutput to show the remote stream provided by the Kurento Media Server.
Inside this function, a call to generateOffer is performed. This function accepts a callback in which the SDP offer is received. In this callback we create an instance of the KurentoClient class that will manage communications with the Kurento Media Server. So, we need to provide the URI of its WebSocket endpoint. In this example, we assume it’s listening in port 8888 at the same host than the HTTP serving the application.
[...]

var args = getopts(location.search,
{
  default:
  {
    ws_uri: 'ws://' + location.hostname + ':8888/kurento',
    ice_servers: undefined
  }
});

[...]

kurentoClient(args.ws_uri, function(error, client){
  [...]
};
Once we have an instance of kurentoClient, the following step is to create a
Media Pipeline, as follows:
client.create("MediaPipeline", function(error, _pipeline){
   [...]
});
If everything works correctly, we have an instance of a media pipeline (variable
pipeline in this example). With this instance, we are able to create
Media Elements. In this example we just need a WebRtcEndpoint and a
FaceOverlayFilter. Then, these media elements are interconnected:
pipeline.create('WebRtcEndpoint', function(error, webRtcEp) {
  if (error) return onError(error);

  setIceCandidateCallbacks(webRtcPeer, webRtcEp, onError)

  webRtcEp.processOffer(sdpOffer, function(error, sdpAnswer) {
    if (error) return onError(error);

    webRtcPeer.processAnswer(sdpAnswer, onError);
  });
  webRtcEp.gatherCandidates(onError);

  pipeline.create('FaceOverlayFilter', function(error, filter) {
    if (error) return onError(error);

    filter.setOverlayedImage(args.hat_uri, -0.35, -1.2, 1.6, 1.6,
    function(error) {
      if (error) return onError(error);

    });

    client.connect(webRtcEp, filter, webRtcEp, function(error) {
      if (error) return onError(error);

      console.log("WebRtcEndpoint --> filter --> WebRtcEndpoint");
    });
  });
});
注解
The TURN and STUN servers to be used can be configured simple adding
the parameter ice_servers to the application URL, as follows:
https://localhost:8443/index.html?ice_servers=[{"urls":"stun:stun1.example.net"},{"urls":"stun:stun2.example.net"}]
https://localhost:8443/index.html?ice_servers=[{"urls":"turn:turn.example.org","username":"user","credential":"myPassword"}]
Dependencies
The dependencies of this demo has to be obtained using Bower. The definition of these dependencies are defined in the bower.json file, as follows:
"dependencies": {
   "kurento-client": "6.6.0",
   "kurento-utils": "6.6.2"
}
注解
We are in active development. You can find the latest version of Kurento JavaScript Client at Bower.